To learn how to create a new document using tags please jump to the following article Creating a Document using Tags in RMail
Standard Tags
The E-Sign Tags – a unique feature in the RMail system allows the sender to include a set of predefined placeholders in a word document to be mapped with the inputs provided by the signer whilst signing a document through E-Sign. This allows the sender to receive an RMail contract document with the values embedded in the final PDF. The signers can enter their information such as Name, Date, Title (optional), and Signature printed at the required location within the contract using the form field tags.
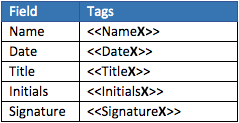
The “X” in the Tag denotes the signer’s order of signing.
If there are two signers to the document, the tags used within the document would be: <<Signature1>> and <<Signature2>>. The signer who signs first (the first recipient included in the “To:” field of the email) will have their signature printed at the location <<Signature1>>.
Custom Tags
Custom tags compose of various fields separated by a comma (,), included between Angular Brackets (<< >>). The Color, Font, and Font Size of each tag is defined by the tag’s own Color, Font, and Font Size. You can view this after the document is signed and the values are mapped into the document.
Nomenclature: <<[ORDER], [LABEL], [FIELD_TYPE + LENGTH], [SIGNER_ORDER], [OPTIONAL]>>
There are multiple ways you can define tags in a word document using the following Tag fields:
- Order: A numeric value that indicates the order in which the fields are displayed to the signer on the “document signature page”, from top to bottom.
Possible values: natural numbers (1,2,3, etc.)
- Label: A string value will be displayed as the label of the form field to be completed by the signer. To allow for commas as part of the string, a label should be in between double quotation marks “”. If empty quotation marks are provided (or if the tag has two consecutive comma delimitators), the label of the field will be left blank.
Possible values: any character in any language, with a maximum length of 25 characters.
- Field Type + Length: Nature of the field, which will also be useful to validate the values entered.
Possible values: N = numeric, AN = alphanumeric, D = date, TS = timestamp, C = Checkbox, S = signature + Length (Length only relevant for N and AN field types)
The following chart shows examples of the different field types you can use in the Word document.
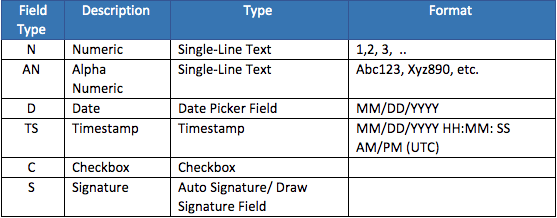
Note: It is mandatory to specify the length of Numeric (N) and Alpha-Numeric (AN) fields when creating a tag. Example: AN20 denotes an alphanumeric tag that has a provision for the signer to enter a maximum of 20 characters. No additional input is allowed after the maximum length is reached.
- Signer Order: This field will be used to identify which tag belongs to which signer. The Signer Order field value corresponds with the order in which recipients are displayed in the “To” field in the email.
Possible values: natural numbers (1,2,3, etc.)
- Optional Field Indicator: By default, it is mandatory for the signer to provide inputs for all tag fields in a word document. This is indicated in the Web User Interface with a red Asterisk (*) appended to the field label.
However, the sender can make an input field optional by adding an “O”.
Here are some examples of Custom Tags:
<<1,”Company Name”, AN20,1>>
Displayed on top of the other fields, Company name label, alphanumeric field with a maximum of 20 characters, assigned to signer 1, required.
<<2,”Date of birth”, D,2, O>>
Displayed in 2nd place from top to bottom, Date of birth label, Date field, assigned to signer 2, optional.
<<3, S,1>>
Displayed in 3rd place from top to bottom, no additional label, signature field, assigned to signer 1, required.
<<4,”Please, enter your name”, AN25,1>>
Displayed in 4th place from top to bottom, name label, alphanumeric field with a maximum of 25 characters, assigned to signer 1, required.
Tag Settings
Perform the following steps to configure tags for RMail:
1. Contact an RPost Representative to provision your RMail account
2. To use RMail Tags with an Outlook Desktop plugin, log-in to your company’s RPortal account and verify the following settings under your Company Account.
Company Accounts > Settings > Electronic Signatures > Document Annotation > Set by App